Subusers
This user guide is designed to help you navigate our new feature. Customer admin can create sub-users and assign customized access to the platform as well as assign only certain vehicles to the sub-user that the sub-user will have access to when logging in.
How to create sub user account
To create a sub user account, go to ‘Manage Users’ under the ‘Profile’ icon in the left panel. Then, follow the instructions to add a new sub user account.


On the ‘Manage Users’ tab, click ‘Create Subuser’ to add a new sub user and set up their login credentials.
User Details

Once clicked, fill in the required fields and then click ‘Next’.
Permissions
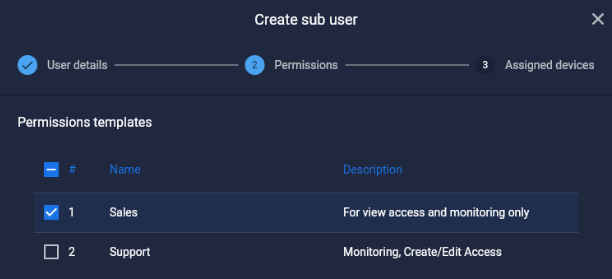
Under the Permissions section, you will assign access levels for the new sub user account. If you have an existing permissions template, you can apply it and proceed.
Assigned Devices

If you don’t have a permissions template, you will need to manually select the desired access levels for the new sub user account. Access options include view, edit, create, and delete. You can customize permissions according to your needs. For example, if you want Staff A to only have monitoring access, you can select the ‘View’ option for the relevant pages and ensure other permissions are unchecked.
Assigned Devices
Finally, choose the devices/vehicles that the account should be able to view or modify. You can select as many vehicles as needed.

Don’t forget to click ‘Create’, and you have now created a sub user account.
Manage User Page - Action Buttons
Action buttons are used to make changes to the sub user account. Below are descriptions of each button and how to use them.

Edit Assigned Devices - Click the ‘car’ icon to manage the devices assigned to a subuser. You can add or remove devices as needed. After making your adjustments, click ‘Update’ to save.
Edit sub user - To modify a sub user's details, click the ‘pencil’ icon. You can update fields such as first name, last name, email, password, phone, and timezone. Click ‘Update’ to save your changes.
Edit Permissions - Click the ‘key’ icon, and to change the permissions for a sub user simply check/uncheck the boxes of which you want to give/remove access, and then click ‘Update’ to apply your changes.
Delete sub user account - To remove a sub user account permanently, click the ‘trash’ icon. Confirm the deletion when prompted, and click ‘Delete’. Ensure you click the ‘trash’ icon next to the correct sub user account.
Login as sub user acc - This allows you to access and interact with the platform as the sub user, giving you an overview of their permissions and access.
How to set a sub user account status
If a sub user account hasn't been used for a while you may change their status to inactive.

Simply click the toggle switch to set it to 'Inactive' status. Click ‘yes’ when prompted. You can also click on it again to set the status back to ‘Active’. This can help to distinguish accounts.
Creating permissions template
This setting is useful to make preset permissions, so that you don’t have to manually set permissions whenever creating a new sub user account. Simply fill up the fields such as name and description. Check the boxes that you want to be accessed under that template.


After creating one, it will all get listed, along with how many sub users are under that role.
Edit - Allows you to make changes in the same fields when you first created the template. Simply click on the ‘pencil icon’.
Delete - If you want to remove a template, just click on the ‘trash’ icon. The system will ask a confirmation message first and then click ‘Delete’. Make sure that you’ve selected the ‘trash’ icon in the same row of the template you plan to delete.
END OF DOCUMENT